Wire ropes for haulage purposes are usually made from carbon steel wires
ranging from 0,35 to 0,5% carbon, and before drawing the material is
subject to a heat-treatment known as patenting.
Patenting consists of passing the wire through tubes in a furnace at about
970oC. This high temperature treatment produces uniform austenite of rather
large grain size. The subsequent cooling - in air or molten lead - is
rapid since the sections treated are generally small (e.g. wire rods),
so that the resulting structure consists of very fine pearlite preferably
with no separation of primary ferrite.
The large crystals would give rise to brittleness if the material was
left in the heat-treated condition, but this effect is not noticed after
a few drawing passes. Variation in hardness - either softer or
harder - can be produced by tempering martensite, but such material
does not draw so well as patented wire, which is able to withstand
reductions of area up to 90%. The strength is explained on the basis
of the reduced ferrite cells and the alignment of cementite in fibres.
Hardenability, mass effect, ruling section
Hardenability is the measure of the depth to which a steel will harden on quenching.
The maximum hardness is mainly a function of the carbon content.
The hardenability of steel depends on:
- The quenching medium and method of quenching.
- Composition of the steel and method of manufacture.
- Section of the steel.
The so-called "Mass effect" arises from the fact that even with the most
severe quench the cooling of a bar is progressively slower, from the
outside to the centre due to the low thermal conductivity of the steel.
It must be appreciated, therefore, that it is the rate of cooling of
a piece of steel which determines the properties resulting from a
quenching process, and not mass or weight.
The effects of mass are shown by the following results (Table 1) on
quenched bars of varying section, from the centre of which standard test
specimens were machined. To prevent the misuse of steels it has become
desirable to state the limit of thickness or "ruling section" up to which
the mechanical properties quoted can be obtained. For sections other than
cylinders, reference should be made to BS 970 for conversion factors.
One of the most important functions of alloying elements in high tensile
steels is to produce fully hardened structures in large sections.
|
Table 1. |
Effect of mass on the properties of carbon steel:
C-0,45%, Si-0,32%; Mn-0,78%; S and P-0,02% |
| Dia. of bar, mm |
Tensile Strength Rm, MPa |
Elongation, A, % |
Izod, J |
|
Water quenched from 870oC and not tempered |
| 17 |
1853 |
3 |
4 |
| 29 |
1035 |
8 |
18 |
| 76 |
803 |
15 |
32 |
|
Tempered at 600oC |
| 17 |
850 |
18 |
103 |
| 76 |
741 |
25 |
59 |
Shallow hardening steels (C 1%; Mn 0,3%) are often used for dies in which
a tough core and a hard skin is required. The depth of hardening is
increased by drastic quenching media, and by manganese and elements such
as nickel and chromium, but decreased by fine austenite grains.
The addition of 3% nickel and 1% chromium retards the transformation
of austenite so much that oil quenching exceeds the critical cooling
velocity and all portions from edge to centre of average sections will
harden. The results in Table 2 illustrate this effect and should be
compared with the ones in Table 1.
|
Table 2. |
Effect of mass on properties of alloy steel:
C-0,31%, Si-0,14%; Mn-0,70%; Ni-3,27%, Cr-0,82% |
| Dia of bar, mm |
Tensile Strength Rm, MPa |
Elongation, A, % |
Izod, J |
|
Oil quenched from 820°C, tempered at 600°C |
| 17 |
958 |
24 |
85 |
| 76 |
927 |
22 |
82 |
It has now been found that small additions of a number of alloying
elements are more effective than an equivalent total addition of one
element, and enables appropriate use to be made of alloy scrap.
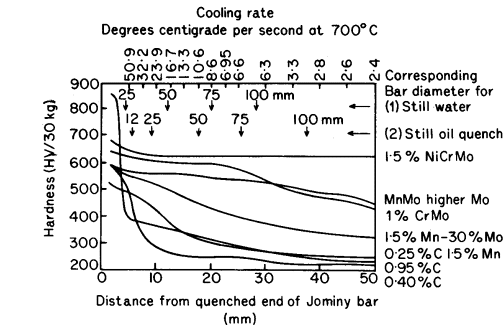
In the Jominy test (BS 4437) a 25 mm dia bar 100 mm long is heated to the
normal hardening temperature, then inserted in a standard jig and a
12,5 mm dia jet of water at 24oC is directed against one end of the
test piece. The free height of the jet is 62,5 mm.
When cold, hardness measurements are made along flats on the bar and these
are plotted against distance from the quenched end as in Fig. 1, which
also includes the cooling rates at various distances from the quenched
end. The positions along the Jominy bar having cooling rates equal to
those at the centres of bars of various diameters are marked in Fig. 1
for water and oil quenching.

|
| Figure 1. Hardness distance curves for end quench test samples |
From the Fig. 1 the effectiveness of a given quench on various steels can
be judged; for example, bars of 1,5% Ni Cr Mo steel up to 100 mm dia can
be satisfactorily hardened in oil, whereas for the plain 0,95% carbon
steel the maximum diameter of the fully hardened bar will be less than
12,5 mm for the same quench.
The Jominy end quench test is not only a very reproducible test. but is
also an excellent laboratory test for classifying steels in order of
merit as regards hardenability and it gives a very useful first
approximation to the merits of a given steel. As to whether a steel
with a particular hardenability will give the satisfactory mechanical
properties in a particular section must be decided by trial.
Actually, the method of trial - apart from giving the final answer - is
also, in many cases, far simpler than the involved mathematical processes
which have been developed in an endeavour to predict the mechanical
properties of a steel in any given section from the Jominy curve.

|
| Figure 2. Designation of hardenability limits
|
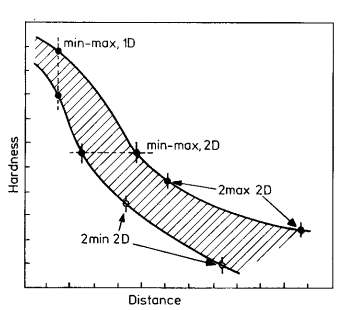
The hardenability of different casts of steel of the same analysis may
vary substantially and similarly significant variations in hardenability
may occur in samples taken from different parts of the same ingot.
As a consequence Jominy results are given as bands not simple curves
and BS 4437 uses two points to specify hardenability as shown in Fig. 2
and as follows:
| 1) |
A desired hardness value at 2 desired distances, e.g. |
A-A |
| 2) |
Minimum and maximum hardness values at desired distance |
B-B |
| 3) |
Two maximum hardness values at 2 desired distance |
C-C |
| 4) |
Minimum hardness values at 2 desired distances |
D-D |
| 5) |
Any minimum and any maximum hardness. |
List of Articles - Knowledge Base